Introduction
eDirectory 11 is built with the PHP framework Symfony. For the frontend, it’s based on Bootstrap v3.3.4 and two auxiliary tools, Twig and Assetic. Twig is a template engine for PHP that removes the complexity and massive PHP code from the HTML, creating an easy and friendly code to maintain. In the other hand, the library Assetic is used to manage assets files, creating the main stylesheet file to be included in all frontend pages.
Let’s start with the stylesheet structure. eDirectory 11 works with 3 main stylesheet files:
- style.css -> The result of the compilation of all .less files by Assetic. It includes all css declarations, including third-party plugins, and should not be changed.
- colorscheme.css -> This file is used when the customer uses the feature Color Options, which gives the site manager the ability to overwrite the main colors of the theme. This file is generated from the file
edirectory/web/theme/customtheme/colorscheme.php, which is basically a regular stylesheet file, but in PHP format. When a color is changed, the system uses this base file, replaces the color and generates the finalcolorscheme.cssfile again. - csseditor.css -> Available when the customer uses the feature CSS Editor , which gives the site manager the ability to customize the theme without direct access to the stylesheets files. This file is empty by default, and it’s the last one added on the page structure.
Working with Less
eDirectory source code is written in LESS, a CSS pre-processor, meaning that it extends the CSS language, adding features that allow variables, mixins, functions and many other techniques that allow you to make CSS that is more maintainable, themable and extendable. The code is split in several .less files, that generates a single .css in the end. On the file edirectory/app/Resources/themes/customtheme/base.html.twig, the block stylesheets calls all files for your theme. See below:
{% spaceless %}
   {% block stylesheets %}
       {% stylesheets
       filter='cssrewrite'
       output='assets/css/customtheme/style.css'
       '%kernel.root_dir%/Resources/themes/customtheme/assets/less/theme.less'
       'assets/js/lib/owl-carousel/*.css' %}
       <link href="{{ asset_url }}" rel="stylesheet"/>
       {% endstylesheets %}
   {% endblock -%}
{% endspaceless -%}

<link href="{{ asset(getDomainParameter('path') ~ 'theme/customtheme/colorscheme.css') }}" rel="stylesheet"/>

{% if file_exists(getDomainParameter('path') ~ 'theme/customtheme/csseditor.css') -%}
   <link href="{{ asset(getDomainParameter('path') ~ 'theme/customtheme/csseditor.css') }}" rel="stylesheet"/>
{% endif -%}
The first part of the code is simply telling the system to get all .less files listed on edirectory/app/Resources/themes/customtheme/assets/less/theme.less and compile them to the final .css edirectory/app/assets/css/customtheme/style.css. Next, it’s includes the custom colors file (colorscheme.css) and finally, it checks if exists a custom css file generated by the CSS Editor feature and includes it.
If you’re making changes to your .less files in production, Assetic should automatically compile them again after every change. In development, you need to do the following:
Browse to the root folder of your project using a command line tool, like Terminal for Mac, and run the following command:
app/console assetic:watch This command will be watching the assets folder and will recompile the main stylesheet file every time any changes are done in one of the LESS files.
Any css file on the folder edirectory/app/Resources/themes/customtheme/css/ will be automatically added to the minimized file style.css.
Less Structure
eDirectory .less files are based on the frontend framework Bootstrap v3.3.4 and only the main file theme.less is called by ASSETIC. This file replaces bootstrap.less and contains all @import including variables, mixins, plugins and resets.
When you start your theme customization, start by setting the main characteristics of the layout on the file variables.less. This file determines the colors and sizes used on mixins and functions. Read the file carefully before editing any variable and don’t forget to update the default colors in the colorscheme file: default_themecolors.inc.php (see more details on the topic Color Scheme).
After importing the main bootstrap files, eDirectory special styles are included. See below the file structure for a default eDirectory v11 Instalation:
//eDirectory Components
@import "main-structure.less";
//The main elements are listed here. header, search, blocks and footer.

@import "theme-box.less";
//The card structure to display eDirectory Items.

@import "reviews.less";
//Style for Reviews boxes and reviews rating

@import "social-links.less";
//Facebook buttons, social likes counter and any social interaction

@import "list-columns.less";
//Display list as columns with css3 rules

@import "calendar-events.less";
//Events calendar

@import "newsletter.less";
//Newsletter box style

@import "summary.less";
// All summary items layout

@import "detail.less";
// All detail pages layout

@import "special-pages.less";
// Faq and Sitemap

@import "login.less";
// Login Page style

@import "plans.less";
// Advertise Page Style for plans boxes

@import "members.less";
// Old structure for members layout

@import "scheme-members.less";
// Old structure for members layout colors

@import "order.less";
// Orders page
HTML Structure
To customize an eDirectory theme, you’ll be working on the following folders:
1) /edirectory/app/Resources/themes/customtheme: The main structure of the theme on Symfony’s structure, using Twig, a template engine for PHP. Below are listed the main files that you should be familiar with:
-
base.html.twig: base html structure, including the main tags html, head and body.
-
index.html.twig: structure for the home page
-
maintenance.html.twig: maintenance page
-
results.html.twig: results page
-
/assets/less: all .less files are here
-
/blocks: the pages are structured in smaller blocks that can be found on this folder
-
/modules: Twigs for each module, split mainly on index, results and detail
-
/pages: secondary pages like contact us, faq, site map, etc
2) /edirectory/web/theme/customtheme: eDirectory still has some legacy code that was not migrated to Symfony yet. The profile and members sections are one of those code. For the profile section, it has the same header and footer as the frontend structure, and the HTML is duplicated on this folder. If your customization includes any structure change on the header or footer, it should be replicated on the files header.php and footer.php from this folder.
Color Scheme
The color scheme features allows the site manager to easily change the main colors of the site.
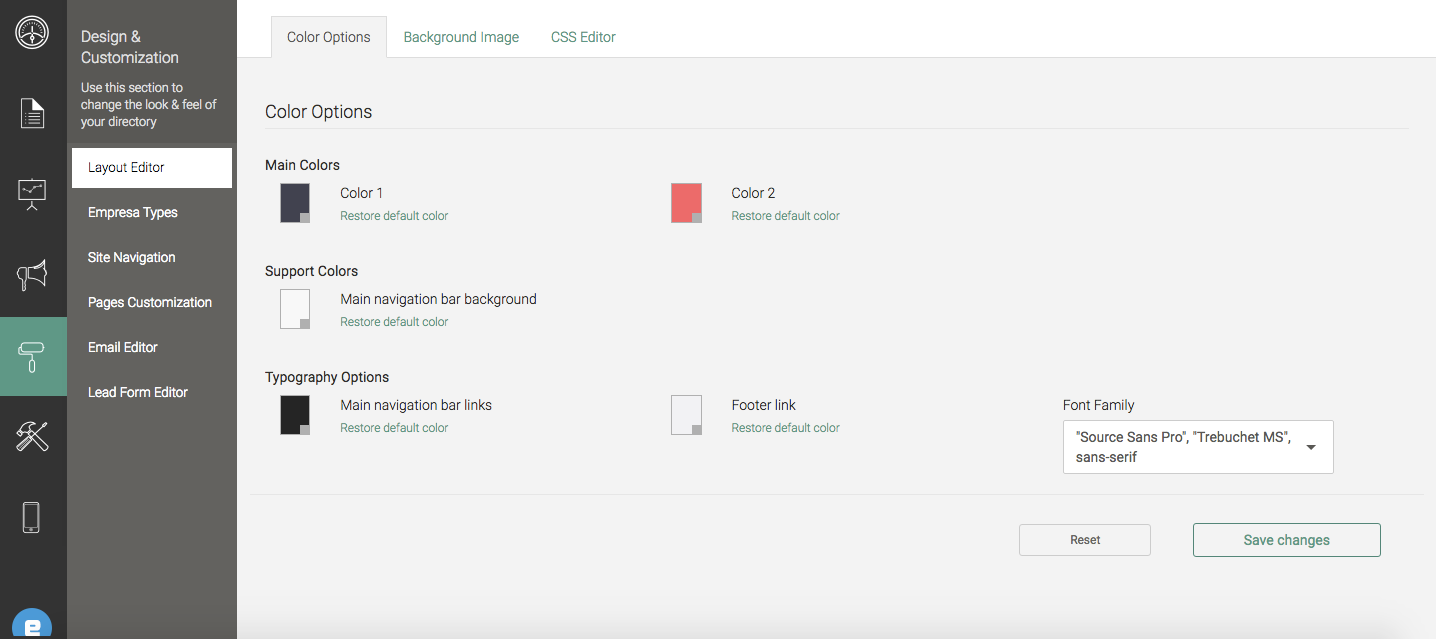
eDirectory’s default theme offers five colors to be changed:
- Color 1 and Color 2: these are the two main colors of theme pallet
- Main navigation background
- Main navigation bar links
- Footer links
If you need more colors, talk to a developer, some PHP changes will be needed.
Additionaly, it’s also possible to change the font family.
The last step of your theme customization is to update this functionality. This is done in two steps:
1) Update the default colors: here you simply need to tell the system which are the default colors of your theme, so the site manager can easily restore the pallet. To do so, open the file edirectory/web/conf/default_themecolors.inc.php. Copy the block of an existing theme, paste it before the line define("ARRAY_DEFAULT_COLORS", serialize($arrayColors)); and replace the colors. See example below:
1.1) Original file
# ----------------------------------------------------------------------------------------------------

.
.
.
.
.
.
.

//Theme: Wedding
//Scheme Color: Wedding

//Main pallete colors
$arrayColors["wedding"]["wedding"]["color1"] = "7f4c4c";
$arrayColors["wedding"]["wedding"]["color2"] = "ff9797";

//Advanced colors
$arrayColors["wedding"]["wedding"]["colorNavbar"] = "fcfcfc";
$arrayColors["wedding"]["wedding"]["colorNavbarLink"] = "7f4c4c";
$arrayColors["wedding"]["wedding"]["colorFooterLink"] = "ffffff";
$arrayColors["wedding"]["wedding"]["fontOption"] = "1";
$arrayColors["wedding"]["wedding"]["fontName"] = "\"Source Sans Pro\", \"Trebuchet MS\", sans-serif;";

$arrayColors["wedding"]["wedding"]["colorKnob"] = "333333";

define("ARRAY_DEFAULT_COLORS", serialize($arrayColors));
1.2) File after adding the new theme called mytheme
.
.
.
.
.
.
.

# ----------------------------------------------------------------------------------------------------
//Theme: Wedding
//Scheme Color: Wedding

//Main pallete colors
$arrayColors["wedding"]["wedding"]["color1"] = "7f4c4c";
$arrayColors["wedding"]["wedding"]["color2"] = "ff9797";

//Advanced colors
$arrayColors["wedding"]["wedding"]["colorNavbar"] = "fcfcfc";
$arrayColors["wedding"]["wedding"]["colorNavbarLink"] = "7f4c4c";
$arrayColors["wedding"]["wedding"]["colorFooterLink"] = "ffffff";
$arrayColors["wedding"]["wedding"]["fontOption"] = "1";
$arrayColors["wedding"]["wedding"]["fontName"] = "\"Source Sans Pro\", \"Trebuchet MS\", sans-serif;";

$arrayColors["wedding"]["wedding"]["colorKnob"] = "333333";

# ----------------------------------------------------------------------------------------------------
//Theme: MyTheme
//Scheme Color: MyTheme

//Main pallete colors
$arrayColors["mytheme"]["mytheme"]["color1"] = "7f4c4c";
$arrayColors["mytheme"]["mytheme"]["color2"] = "ff9797";

//Advanced colors
$arrayColors["mytheme"]["mytheme"]["colorNavbar"] = "fcfcfc";
$arrayColors["mytheme"]["mytheme"]["colorNavbarLink"] = "7f4c4c";
$arrayColors["mytheme"]["mytheme"]["colorFooterLink"] = "ffffff";
$arrayColors["mytheme"]["mytheme"]["fontOption"] = "1";
$arrayColors["mytheme"]["mytheme"]["fontName"] = "\"Source Sans Pro\", \"Trebuchet MS\", sans-serif;";

$arrayColors["mytheme"]["mytheme"]["colorKnob"] = "333333";

define("ARRAY_DEFAULT_COLORS", serialize($arrayColors));
2) Update the base color scheme file: Now you need to update the base css file that replaces the main colors of your theme. This file is a regular css stylesheet, but with PHP extension. Instead of defining the colors, PHP constants are used instead. These constants are like placeholders that will be replaced by the values saved on the sitemgr.
.text-highlight {
    color: #<?=SCHEME_COLOR2?>;
}
On the example above, after changing a color on the site manager, the class text-highligt color will be replaced by the second main color.
The following PHP constants are available:
- SCHEME_FONTOPTION: Font Family
- SCHEME_COLOR1: Main color
- SCHEME_COLOR2: Second color
- SCHEME_COLORNAVBAR: Navigation bar
- SCHEME_COLORNAVBARLINK: Navigation bar links
- SCHEME_COLORFOOTERLINK: Footer links
Constants from a specific section can be used in other sections. For examples, the constant SCHEME_COLORFOOTERLINK is not only used on the footer structure, see below:
.theme-box-inverse .theme-box-content, .theme-box-inverse .theme-box-content p {
    color: #<?=SCHEME_COLORFOOTERLINK?>;
}
Pages List
For your theme customization, you’ll work on three sections of the system:
1) Frontend: all pages available for site visitor. This section includes the following pages:
- Home Page: Initial page of eDirectory.
- Sitemap: Site map page.
- Claim: On this page, visitors can claim their listings. After the process, the user will have created an account and associate the listing for him. The pages below are used on the claim process (sign up, listing edition and payment).
- Listing Level: Listing level edition.
- Listing: Listing edition.
- Billing: Payment option selection.
- Invoice: Payment by invoice.
- Payment: Payment by credit card.
- Process Payment: Payment confirmation.
- Results: Search results page. Remember to customize the summary view for all modules (each one has a different structure).
- Advertise: On this page, visitors can start the sign up process to order an item on eDirectory.
- Order Listing: Sign up for an account and create a listing.
- Invoice: Payment by invoice.
- Payment: Payment by credit card.
- Process Payment: Payment confirmation.
- Order Event: Sign up for an account and create an event.
- Order Classified: Sign up for an account and create a classified.
- Order Banner: Sign up for an account and create a banner.
- Order Article: Sign up for an account and create an article.
- Maintenance Page: Maintenance page (must be turned on by the site manager). This page is basically the header and footer with a section on the body for a custom site content (site contents are blocks of HTML that the site manager can edit).
- Contact Us: Contact Us page.
- Faq: FAQ page.
- Error Page: Error page. Same structure as the maintenance page.
- Lead General Form: Enquire page.
- Listing Home: Listing home page.
- Listing Detail: Listing detail page.
- Listing Reviews: Listing reviews page (this page also exists for Articles)
- Listing All Categories: Page that lists all categories (exists for all modules)
- Listing All Locations: Page that lists all locations (exists for listings, events and classified)
- Event Home: Event home page.
- Event Detail: Event detail page.
- Classified Home: Classified home page.
- Classified Detail: Classified detail page.
- Article Home: Article home page.
- Article Detail: Article detail page.
- Deal Home: Deal home page.
- Deal Detail: Deal detail page.
- Blog Home: Blog home page.
- Blog Detail: Blog detail page.
- Privacy Policy: Privacy policy page. Same structure as the maintenance page.
- Terms of Use: Terms of Use page. Same structure as the maintenance page.
2) Profile: section where visitors can sign up and manage their accounts. This section includes the following pages:
- Profile Add: Page where visitors can create a profile account.
- Profile Edit: Page where visitors can manage their account.
- Profile Home: Profile home page (user must be logged)
- Profile Login: Log in to profile section
- Profile Forgot Password: Page to request a link to reset the password.
- Profile Reset Password: Page to reset the password.
3) Sponsors: section where sponsors can manage their ads, make payments, etc. This section includes the following pages:
- Dashboard: Sponsors home page.
- Faq: FAQ page for sponsors.
- Help: Help page for sponsors.
- Login: Log in to sponsors section.
- Forgot password: Page to request a link to reset the password.
- Reset password: Page to reset the password.
- Account: Page where sponsors can manage their account.
- Article > Add / Edit: Add or edit an article.
- Banner > Add / Edit: Add or edit a banner.
- Classified > Add / Edit: Add or edit a classified.
- Classified > Level: First step to add a new classified.
- Deal > Add / Edit: Create and associate a deal to a listing.
- Event > Add / Edit: Add or edit an event.
- Event > Level: First step to add a new event.
- Listing > Add / Edit: Add or edit a listing.
- Listing > Package: Second step to add a new listing.
- Listing > Backlink: Activate the backlink feature for a listing.
- Listing > Level: First step to add a new listing.
- Listing > Click to call: Activate the click to call functionality to a listing.
- Checkout > Make Payment: Select payment option.
- Pay (step 2): Pay by invoice or credit card.
- Process Payment: Payment confirmation.
- Transactions > History: Manage and view transcations.
- Transactions > View
Usually, the sections Profile and Sponsors do not require any heavy custom work and the HTML should not be changed. Simply go through each page to make sure your new theme style (fonts, typography, etc), was properly applied to these sections.