First Steps
To start creating a new theme, you need to duplicate the default theme folder in app/Resources/themes/ and give it the name of your custom theme.
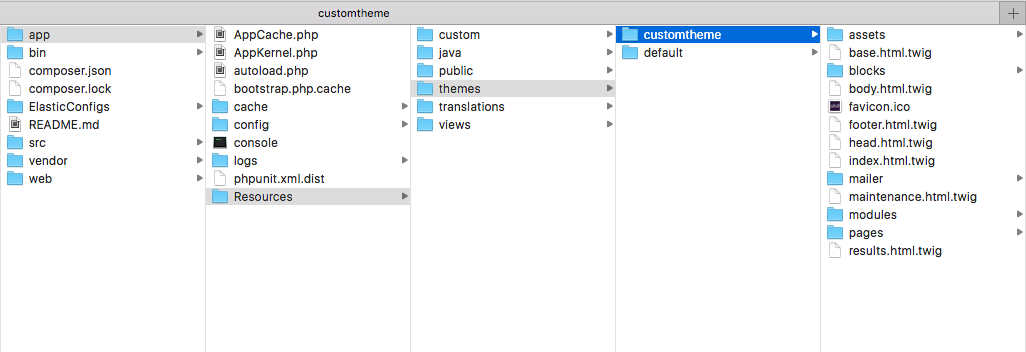
Add the new theme to the config file app/config/config.yml
liip_theme:
   themes:
       - default
       - customtheme
   active_theme: customtheme
Add the new theme to the config domain file app/config/domain.yml
 edirectory-1100.arcasolutions.com:
            id: 1
            path: custom/domain_2/
            template: customtheme
            locale: en_us
            localized: en
            database: edirectory-domain_1
            elastic: edirectory-domain_1
            title: eDirectoryY
            branded: 'on'
Provide the code to enable the clients to change the colors as they want by creating the array configuration for the Color Options Feature in the file web/conf/default_themecolors.inc.php
//Theme: Custom Theme
//Scheme Color: Default

//Main pallete colors
$arrayColors["newtheme"]["newtheme"]["color1"] = "42414f";
$arrayColors["newtheme"]["newtheme"]["color2"] = "ff5a5f";

//Advanced colors
$arrayColors["newtheme"]["newtheme"]["colorNavbar"] = "f8f8f8";
$arrayColors["newtheme"]["newtheme"]["colorNavbarLink"] = "252525";
$arrayColors["newtheme"]["newtheme"]["colorFooterLink"] = "f2f2f4";
$arrayColors["newtheme"]["newtheme"]["fontOption"] = "1";
$arrayColors["newtheme"]["newtheme"]["fontName"] = "\"Source Sans Pro\", \"Trebuchet MS\", sans-serif";

$arrayColors["newtheme"]["newtheme"]["colorKnob"] = "ff5a5f";
Add the new theme to the old list of the available themes in the file web/conf/theme.inc.php
//set default theme
$edir_default_theme = "default";

 //set all available themes separated by comma
$edir_themes = "default,customtheme";
$edir_themenames = "eDirectory Default,Custom Theme";
Then add the tabbar in line 283 of the file web/includes/code/layout_editor.php. This step is not necessary for versions after 11.1.
$availableTabs["customtheme"] = "background,color,css";Creates the folder for the new theme in the web structure: web/theme/customtheme/ And then, add the following files (duplicating from default theme)
In the file web/conf/customtheme_scheme.inc.php, change this settings:
//set default scheme
$edir_default_scheme = "customtheme";

//set all available schemes separated by comma
$edir_schemes = "customtheme";
$edir_schemenames = "Custom Theme";

//code to setup one specific scheme from all available schemes
$edir_scheme = "customtheme";
In the file web/conf/constants_customtheme.inc.php. Change only the configuration needed for the layout according to the mockup and layout. This step is not necessary for versions after 11.1.
Configure the file web/theme/customtheme/colorscheme.php according the possibilities for the layout using CSS language inside a PHP file.
The last thing you need to do to complete your theme is update the THEME column of the Levels table (listing_level, article_level, etc) )in the database. This step is not necessary for versions after 11.1.
This step needs the database access. If you don’t know how to do this, please contact a delevoper.
Working with Less
You can use LESS to build the style for your custom theme. The Assetic is the one that handles with the LESS compilation in the Symfony structure. To use it you need to following the next steps:
Inside the base.html.twig of your theme directory use the following asset configuration:
{% spaceless %}
   {% block stylesheets %}
       {% stylesheets
       filter='cssrewrite'
       output='assets/css/customtheme/style.css'
       '%kernel.root_dir%/Resources/themes/newtheme/assets/less/theme.less'
       'assets/js/lib/owl-carousel/*.css'
       '%kernel.root_dir%/Resources/themes/customtheme/css/*.css' %}
       <link href="{{ asset_url }}" rel="stylesheet"/>
       {% endstylesheets %}
   {% endblock -%}
{% endspaceless -%}

<link href="{{ asset(getDomainParameter('path') ~ 'theme/customtheme/colorscheme.css') }}" rel="stylesheet"/>

{% if file_exists(getDomainParameter('path') ~ 'theme/customtheme/csseditor.css') -%}
   <link href="{{ asset(getDomainParameter('path') ~ 'theme/customtheme/csseditor.css') }}" rel="stylesheet"/>
{% endif -%}
Don’t forget to change the paths to match with the folder of your custom theme. This file has the main structure for header and footer layouts.
Run the command on terminal :
app/console assetic:watch This command will be waiting for any changes in the less files in the assets folder to recreate the compiled CSS files
Now it’s time to setup the main colors for you layout. In the assets/less folder you can find the file variables.less. This file determines the colors and sizes used in the mixins and fucntions used to build de layout. Read the file with attention before editing any variable and don’t forget to update the default colors in the colorscheme file: default_themecolors.inc.php
The main homepage of your new theme is defined in the file index.html.twig. The HTML structure for functions and blocs you can find in the /blocks directory.
If you need to change the header structure, remeber to change the old structure too in web/frontend/header.php. This file is used in Advertise and Profile pages.
To complete the process, choose a pretty image to be displayed in the themes list in Site Manager > Design Layout.
Then, as soon as your initial configuration is right, commit the files to start working in your brand new theme.